Posts

Showing posts from 2017

Begin the rear fuselage bottom skin and longerons (more problems!)

Image
Prepped and built longeron 8, that was pretty easy: And then did the rest: After clecoing things together I found a problem: Note the severe hole misalignment. After much discussions with the factory, it turns out there was ANOTHER manufacturing problem, and the skin is bad. I will be getting a new one!

Ribs 3 and 2 assembly

Image
I have now assembled the remaining ribs 3 and 2! Rib 3 on the jig: And the finished product: The plans were wrong, but at least the parts all fir together nicely this time. And here is rib 2 finished ... forgot to take some pictures of the process. This one is special in that the top faces one way, and the bottom another. As such the jig is also on one side, and then another, instead of being all on one side. Hard to explain without pictures! The top of the rib didn't line up with the jig for me ... but according to the plans those top holes are maybe not supposed to? Everything else line sup perfectly so for now I'll just move on. The shelf support pieces are missing here, though I did add them later! All done the ribs!

Cleaned up the shop!

Image
As I was exchanging e-mails with the factory regarding the ribs, I decided to get the workshop ready for the full fuselage build, which is of course a pretty big piece of kit ... after the ribs, we pull out one of the long skins and really start building the tail, so now is the time to do this. so I finally found some storage space for my elevator: And I placed my tables in the right spot to host the full fuselage: Covered them with "under carpet" (To take out slight imperfections in the surface): And then the carpet, to make sure the "belly" of the plane will no scratch up against the table: All set!

Ribs 3 and 2

Image
So the top of rib 2 doesn't align, due to the flanges not being bent and placed appropriately: And the top of rib 3 does not look like the plans: Which means every. single. rib. had a problem! After some choice words with the factory, it was agreed that: I could cut off the offending flanges in this case (And on other ribs, though I didn't think of it before) My top-of-rib-3 parts are indeed correct, it's the plans that are wrong. So I went ahead and fixed the top of rib 2: And I did all the metal prep work! The parts for these two ribs are "drying" as I type this!

Rib 4 (almost) completed

Image
The "frame" of Rib 4 is completed! I once again had to bend that inside flange out of the way :( Here it is with the extra bits attached: One problem I'm noticing on this rib, and also rib 5 now that I went back and checked, is that the bending of that inside flange created a curvature in the top part of the rib, as you'd expect, really: I expect a bit of fluting along that same inside flange should fix this ... I'll give that a try next.

Rib 5 DONE. On to Rib 4!

Image
Rib 5 completed! And here is a fit test of rib 4: Those flanges that gave me a hard time on Rib 5 are much better on this part, though it's still a slightly tighter fit than it should be, we'll see what I end doing about it when it comes time to rivet.

Rib 5 progress

Image
Rib 5 is the first rib we assemble that requires alignment using a provided jig. As I put that together, I notice that the two side parts did not fit well into the top part on account of the inside flange of the top part getting in the way (Note near the clecos): You can see it better here: I just used a seamer to bend the flange out of the way. Easy. Got the factory to look at it, and got the OK, so I can move on!

Begin the fuselage: Rear rib assembly

Image
The first step to building the fuselage is putting together the rear rib assembly. This is the structural component that goes in the tail of the aircraft and to which the empennage attaches. First things first, more damage ... a small dent!: Not a big deal, carry on ... Test fit some of the parts (Looks like I forgot to take a picture of one of them, there's actually four): You can see all four laid out here however: After priming and assembly, the final result! Everything went swimmingly well with this assembly, I am happy to report: The anchor nuts at the back: The manual calls for AN3 bolts in this location, but did not specify the length ... -4A looked like they would be a tight fit possibly too short, based on the idea that at least 2 threads should stick out past the nut. So I used -5A's ... I've got about 3-4 threads showing, so that's good. I may find myself short some -5A's later, but they're cheap and ea

Elevator finally complete!

Image
OK, so I got the correct trim tab, and guess what? It had some damage! But, I managed to fix it, and get it installed. So finally the end of that ordeal. Also added the rivnuts to hold the trim tab servo access plate: The eight holes surrounding the opening, for the rivnuts, are undersized. So I will have to open them a little bit. But, they are quite close to the edge of the opening, so I will need to support the area when I drill. I'm doing this with clams a piece of wood, simple and effective (Two clamps were actually used, one on each side of the hole): All done: I also put on the other elevator tip: And I can now call the elevator finally done (for now)! Woohoo!

More Trim Tab Woes & Elevator Progress!

Image
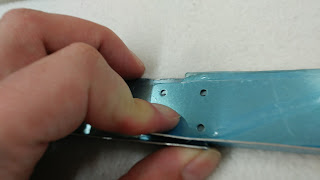
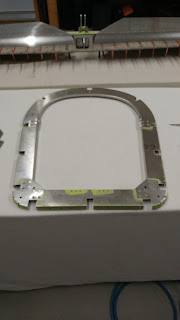
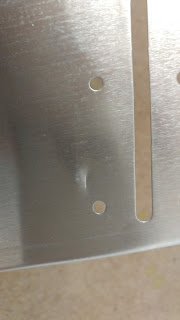
Bad news first. That new, shiny, perfectly straight trim tab? Yeah, it's the WRONG PART! Apparently it was mislabelled as a left trim tab, when it is in fact a right one: The top 2 are my previous, old and busted ones, notice the shape and angle on the right, and the location of the holes for the control horn. The bottom one is reversed! So I guess I'll go ahead and get a *4th* one. But, not to worry, this hasn't stopped me from making good progress on the rest of the elevator: Getting the skin on just right was a bit of a challenge, but I'm quite happy with the result. I gotta say, placing it vertically sure helped: stand at the end, look down the edge, look at the ribs, etc. and adjust as needed. Doing this laying flat on a table would've been far more painful, having it to flip it over constantly (That trim tab is an old dented one, but for the purposes of fitting everything it works fine, it's not yet one permanently). I

Elevator #2 Progressing!

Image
I re-started my elevator as I had botched the first one (entirely my fault). Here it is ready to be skinned: And I finally got a *perfect* trim tab, very very straight! Third time's the charm:

Fixing fuselage skins defect

Image
After talking with the factory, I had a try at buffing out the damage. Luckily, I had the tools: some brown scotch-brite, and some 3M cut & polish wheels, one light and one medium (also used for deburring edges): I'm not going to detail every single spot that had issues (in the end I found 7 skins with scratches/dents), but it turns out this is real easy to do! Before: After: In one spot, I had chose to use some aluminum epoxy filler: Luckily most of the damage is on the inside of fuselage skins, or on inside skins, so no matter what, the work will never be seen. I still wanted to smooth everything out to make sure that there's no chance of any scratch/dent becoming a crack. Unfortunately there is one noticeable 1.5-1.75cm dent that WILL BE visible from the outside, on the fuselage, forward of the wing leading edge, pilot side: I'm going to have to ask for a new one of those ...

Fuselage kit issues

Image
So inventory is nearly done, and here are my findings so far ... First, no longerons! Apparently the kit is made up of TWO crates (Or more precisely one create and one tube) and Jean forgot to send me the tube!! Doh! How does that happen? Secondly, there's some damage from improper packing it seems: I'll have to check with TAF, especially those two bottom ones, they're on a main piece of skin, and since skin is structural ... I'll have an up close look soon ...