Posts

Showing posts from 2018

Center fuselage progress

Image
After long boring work prepping the metal, I finally started assembling everything yesterday! All went quite smoothly!

Main spar and center fuselage progress

Image
Test fitted some of the parts to be attached to the main spar: As it turns out however, the tube guides should not be assembled yet. You will find that the vesconite bushing mentioned in the plans is already mounted to the control tube, and therefore cannot be installed at this stage. I will instead mount the tube guides around the bushing on the control tube, and the whole thing will get attached to the main spar later ... this is how others did it as well it appears. Look for a future blog entry where i will likely show this later! I've also been prepping the numerous other parts for that section of the fuselage. I decided for the first time to remove a strip of protective film, instead of the hole thing all at once. You do this by using a soldering iron to melt a line in the film, allowing to cut it without damaging the underlying skin: Very easy to do and works nicely! Here is the gear mounting box with some connecting parts I am testing for fit and makin

A note on multi-grip rivets and grip size.

Image
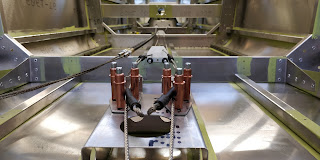
TAF supplies Gesipa multi-grip rivets. This means these rivets can be used on varying thicknesses of material, and therefore "grip" various total thicknesses, hence the name. The rivets have two lines where the material folds over, a lower and and a top one. When the thickness line sup with these lines, rivets look one way, whereas if the material thickness is somewhere in between, they look another. This image illustrates this well: Note how the right and left most rivets look, with the widest part of the bulge flush with the material, versus the two middle ones, where the bulge is a little removed from the material, looking more like a mushroom. I came across a situation where I had two rivets of the same diameter, but different lengths, and used what I later realized was probably not the length the factory had intended (the plans were silent on this). I ended up with rivets looking like this: Now  had never seen this before, because normally you use rivets

Center Fuselage - Rear

Image
The rear part of the center fuselage is now largely complete: Some holes are missing however, will have to drill those out:

Undercarriage kit

Image
Due to forecast price increases, I ordered my next kit early, which contains the landing gear components  and it came in recently!

Begin static system

Image
Ordered the static port and tubing kit from cleaveland tools, and installed the ports as per the instructions. The holes are not as perfect as I would like them to be, but the esthetics can be fixed at time of painting at least. I used some red RTV which seems to really create a good bond!

Rudder cable and top rear skins

Image
I ran the rudder cables, as per the instruction, fairly straight forward: I also spent some time looking at top skin installation. Turns out there are no instructions on those either, only in this case, it can get a little convoluted. First I had to figure out how the top longeron fits. Turns out there's a support angle, as this is where the COM antenna goes! This is discussed in the electrics manual ... you really have to read ahead to catch this! I do NOT plan to have a parachute. But although they say the parachute is optional, the skin is designed for it. I obviously don't want the parachute box, as one reason I don't want it, is I want my cargo space! Will have to enquire about that one.

Rear fuselage skinning

Image
I have been working on the rear fuselage skins! One the one side, there's a hole missing in the skin to match the longeron: As it turns out, that rivet gets in the way of the forward skin that goes on top: So I had to indent the skin a little bit to make room for that rivet (on both sides).   Also discovered that the ribs can sometimes push the skin out, and create a "bulge" in the skin. You can fix this by bending or filing down the offending parts of the ribs, and hammering the skin a little bit. Finally, I proceeded to the forward skins: Don't forget to leave a few unriveted holes for the steps! The installation of the steps is entirely undocumented, but it appears they fit one rivet back from the joint to the center fuselage. Due to a known manufacturing defect, some holes were misaligned, and I create a doubler for added strength:

Rear fuselage progress!

Image
I've been quiet, but working! First of all, finally got my bottom rear skin from the factory, after MONTHS of waiting! Everything fit!!! I cried tears of joy ... Since I had prepped so many parts in advance, I quickly put it all together: That went pretty well. Then onto skinning:

Luggage close off

Image
You close off the tail from the luggage area with a piece that attaches to the rib, like this: Turns out there are 6 holes that are lined up with rivet heads under them, but the holes are too small: So, I enlarged them, easy peasy:

Luggage shelf

Image
While I wait a very very long time for some replacement skins, I've been working my way through the plans and doing all the metal prep and priming. No exciting photos to show for that. But every once in a while I hit an independent assembly I can put together! So, I've go the luggage shelf done! Only thing to report is a slight crack where one of the flange bends occurs. I'll just stop drill it and maybe put some aluminum epoxy in to help.