Posts

Showing posts from May, 2017

VOR Antenna & VS Skin Fit

Image
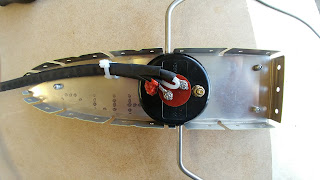
Was waiting on a few more parts! Connected the antenna to its coax cable, which took some figuring out because of this little looped wire that was completely in the way (Part of the "balun" I suspect): I riveted on a cable tie mount and used a cable tie to relieve the forces from the antenna connector itself, and added a bit of RTV silicone to make sure the cable never rubs against one of the mounting screws. Then mount the rib to the rest of the VS frame: Looking good! After making sure the coax was running down to the bottom of the VS nicely, I fitted the skin: Had to open up the antenna holes a bit to prevent rubbing, but everything else seems to fit nicely. Next to deburr, prime and rivet on one side of the skin (Keep the other side clecoed for inspection and to work on lighting wiring, something still to be figured out).

VS & VOR Antenna Work

Image
Had to take a break while my VOR antenna came in, as it was back ordered, so I took a couple of weeks off! Finally, it has arrived. I chose the  RAMI AV-12L . First, I put the frame together: Then, attach the doubler plate and the antenna to the top rib: Upside of this antenna, it's more affordable and less draggy than the obvious alternatives. Downside is, the 2 "rods" are not removable. This means that instead of holes to run them through, I need "slots". So I put those in and made sure to file and deburr everything. Once in place, I secured with the screws and locknuts: I also placed the rib in its spot and cut out the skin where needed: Not the best looking thing, since I had to notch it out, instead of holes. We'll see what we can do to beautify this when comes pain time. Finally, I ran the coax cable for the antenna through the ribs: Note the absence of wiring for lighting. Given my predicament with the lights, this

Skinning the horizontal stabilizer, and working vertically

Image
With the front spar issue fixed, I can move forward on the HS. It was the first assembly I started, and it is a relatively simple one, so I'm looking forward to being able to call that one complete. I ran the electrical wire for the trim, through the grommets, and the edge protection in the lightning hole, and now I proceed to skinning: Again, note how I work vertically. Things line up very nicely this way. No requirement to "get kinks out", to try and stretch the skin, or anything like that. I started with it lying on a table, but again, this part is NOT flat, and when I flipped it over to the other side, things were not looking as lined up as I'd hoped. The minute I put it up, thing fell into place quite nicely. You can see it's precariously sitting on some bits of 2x4's ... not super stable, but stable enough. I just don't leave it alone like that. This is actually the fairly common way to assemble these kinds of components. I suspect T

The HS spar is fixed!

Image
Fits like a glove this time :)

Yet more elevator work!

Image
I got my HS and elevator parts in the same shipment, but since I got going on the elevator, I'll keep doing that! As you can see I found a neat way to work vertically. The empennage assemblies are not actually flat and tend to move/rock on a table top, which drives me nuts. So I let gravity do the work ... and I learn from other builders on other kits, where this kind of technique is more common.

Elevator challenges

Image
Not been having luck lately! First, settings the rivets int he control horn didn't work quite as planned. One stem ended up loose, and one ended up crooked. Because these are stainless steel rivets, forget about drilling them out in any accurate, simple fashion. So, new parts ordered! Secondly, the trim tab ended up warped. I think I may have bent it accidentally while trying to remove the plastic sheet from inside. Ordering new parts!