Posts

Showing posts from October, 2017

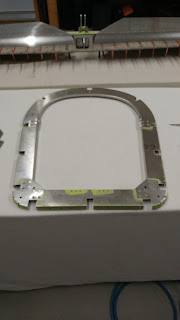
Rib 4 (almost) completed

Image
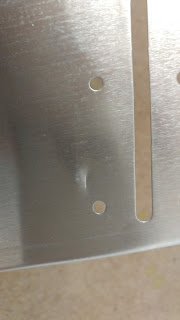
The "frame" of Rib 4 is completed! I once again had to bend that inside flange out of the way :( Here it is with the extra bits attached: One problem I'm noticing on this rib, and also rib 5 now that I went back and checked, is that the bending of that inside flange created a curvature in the top part of the rib, as you'd expect, really: I expect a bit of fluting along that same inside flange should fix this ... I'll give that a try next.

Rib 5 DONE. On to Rib 4!

Image
Rib 5 completed! And here is a fit test of rib 4: Those flanges that gave me a hard time on Rib 5 are much better on this part, though it's still a slightly tighter fit than it should be, we'll see what I end doing about it when it comes time to rivet.

Rib 5 progress

Image
Rib 5 is the first rib we assemble that requires alignment using a provided jig. As I put that together, I notice that the two side parts did not fit well into the top part on account of the inside flange of the top part getting in the way (Note near the clecos): You can see it better here: I just used a seamer to bend the flange out of the way. Easy. Got the factory to look at it, and got the OK, so I can move on!

Begin the fuselage: Rear rib assembly

Image
The first step to building the fuselage is putting together the rear rib assembly. This is the structural component that goes in the tail of the aircraft and to which the empennage attaches. First things first, more damage ... a small dent!: Not a big deal, carry on ... Test fit some of the parts (Looks like I forgot to take a picture of one of them, there's actually four): You can see all four laid out here however: After priming and assembly, the final result! Everything went swimmingly well with this assembly, I am happy to report: The anchor nuts at the back: The manual calls for AN3 bolts in this location, but did not specify the length ... -4A looked like they would be a tight fit possibly too short, based on the idea that at least 2 threads should stick out past the nut. So I used -5A's ... I've got about 3-4 threads showing, so that's good. I may find myself short some -5A's later, but they're cheap and ea

Elevator finally complete!

Image
OK, so I got the correct trim tab, and guess what? It had some damage! But, I managed to fix it, and get it installed. So finally the end of that ordeal. Also added the rivnuts to hold the trim tab servo access plate: The eight holes surrounding the opening, for the rivnuts, are undersized. So I will have to open them a little bit. But, they are quite close to the edge of the opening, so I will need to support the area when I drill. I'm doing this with clams a piece of wood, simple and effective (Two clamps were actually used, one on each side of the hole): All done: I also put on the other elevator tip: And I can now call the elevator finally done (for now)! Woohoo!