Posts

Showing posts from March, 2017

Misaligned holes, or rookie mistake?

Image
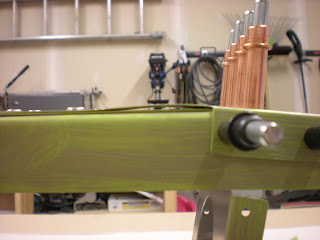
I have been riveting my HS, and have run into a bit of a snag: Note the bent metal. This is where the two front spar channels meet. I had some hole alignment issues on my first try, so I unclecoed and reclecoed everything, and things went better at first, and a number of rivets are indeed set: But then I noticed the above, possibly a little later than I should have. The remainder of the rivets to set on that side of the HS will not go in (See the two matching rows of clecoes below, on the flanges of the spar). Note how the "top" ones are set. There is some misalignment left, however small, and I can't proceed further without having to do some things I'm not sure about at this point. ​Thoughts so far: One solution i could contemplate: match-drill/ream the problematic holes, and just keep going. Once the two holes where the bend is situated are "used" (to attach to the airframe I presume), it might all end up solid enough. The holes

Cleaning and priming of horizontal stabiliser parts completed!

Image
Next step in empennage preparation was prepping the metal for priming, and then priming. I am electing to follow the recommendation from the factory to prime only mating surfaces. This is much easier than having to deal with fully spraying all the parts, which is a much more involved process I don't feel is entirely warranted for 6061-T6 aluminum, which is already quite corrosion resistant. Priming mating surfaces is also what Zenith aircraft recommends, on the same aluminum alloy, for corrosion protection, as can be seen in this EAA video . My approach: I am using Stewart System's EkoPrime primer product, instead of the Cortec VCI-373. This is mostly because I can't quite figure out how to source the Cortec in any convenient manner. The Stewart Systems products seem to have a good reputation, and are easily sourced via Aircraft Spruce. I am using a coloured product, in my case the Zinc Chromate Green. Many builders use the white version that turns clear after

Horizontal stabiliser deburring & fluting completed!

Image
I have now completed the deburring and cleaning of the horizontal stabiliser. It went rather well. I won't document the process, as the internet does a fine job already. Some noteworthy points however: In some spots the protective film was not doing its job, leaving a white/milky surface. This is easily cleaned with isopropanol. The manufacturing seems to do a decent job of not leaving too many burrs, I run my fingers along edges and use files and other tools to remove the burrs I find, and only those: There are many other ways to deburr of course, notably sandpaper and deburring wheels, both of which I have ... so I will continue to experiment ... the files work nicely and precisely, but are maybe  a little slow. Then again, I'm not in a hurry! Ribs are also fluted! Finding ways to flute the small nose ribs without bending too much metal and create sharp edges is a little tricky, but luckily given their size, not much fluting is required anyways. Found a fe