Posts

Fuselage kit has arrived!

Image
The fuselage arrived on Friday! Very happy about this major step forward! I am electing to do this first instead of the wings (traditionally one does the wings first) because there's the possibility of new wings being available down the line, and also new wing tips that will fix my lighting issues easily. With the cover off: And with the top layer off: Lots of parts in there, and a very heavy box! Inventory will take some time.
Rudder completed for now!

Image
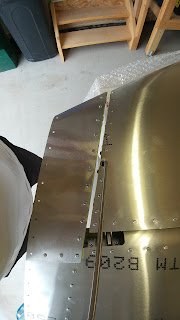
I've riveted the two skins on as much as I can for now until inspection, and made sure it fits with the VS well enough. It's a very quick test, but all looks well. I was especially curious about the spacing between the rudder and the VS up top, where the VOR antenna screws are. I may also add grounding screws for the lighting around there ... lots of room! Satisfying day :)

Rudder skin fit test

Image
All parts are deburred and primed and riveted together. My plans completely omit the installation of one part, so I nearly forgot to put in ... luckily it connects with the skin, so I quickly noticed the empty holes! Here is the result: Despite the slightly malformed parts, looks like everything should it nicely! I guess the fluting helped!

Rudder Prep Work

Image
Deburred all the rudder frame parts (i.e. all but the skins), and then primed. I consistently find parts with small "issues", which is getting tiresome. Today there was this rather thick rib with no curved bends that wasn't straight: Really seems like that shouldn't be, since there's no curvature, it should've remained flat through the manufacturing process ... looks like it was abnormally bent somehow. I did some fluting to it, hopefully that'll work out OK. And then a piece that again has some abnormal bends into it: (Note the right side in the picture, not straight at all). I tried the seamer to no avail ... I also clamped it down with a block, didn't change much ... Hopefully I'll manage to get it fitting OK.

Done VS for now, starting the rudder

Image
OK, I riveted the one side of the VS, and put it away for now: And pulled out the rudder bits and removed the plastic film:

VOR Antenna & VS Skin Fit

Image
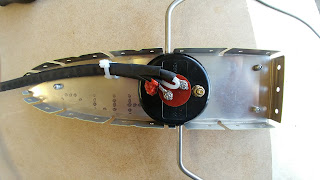
Was waiting on a few more parts! Connected the antenna to its coax cable, which took some figuring out because of this little looped wire that was completely in the way (Part of the "balun" I suspect): I riveted on a cable tie mount and used a cable tie to relieve the forces from the antenna connector itself, and added a bit of RTV silicone to make sure the cable never rubs against one of the mounting screws. Then mount the rib to the rest of the VS frame: Looking good! After making sure the coax was running down to the bottom of the VS nicely, I fitted the skin: Had to open up the antenna holes a bit to prevent rubbing, but everything else seems to fit nicely. Next to deburr, prime and rivet on one side of the skin (Keep the other side clecoed for inspection and to work on lighting wiring, something still to be figured out).

VS & VOR Antenna Work

Image
Had to take a break while my VOR antenna came in, as it was back ordered, so I took a couple of weeks off! Finally, it has arrived. I chose the  RAMI AV-12L . First, I put the frame together: Then, attach the doubler plate and the antenna to the top rib: Upside of this antenna, it's more affordable and less draggy than the obvious alternatives. Downside is, the 2 "rods" are not removable. This means that instead of holes to run them through, I need "slots". So I put those in and made sure to file and deburr everything. Once in place, I secured with the screws and locknuts: I also placed the rib in its spot and cut out the skin where needed: Not the best looking thing, since I had to notch it out, instead of holes. We'll see what we can do to beautify this when comes pain time. Finally, I ran the coax cable for the antenna through the ribs: Note the absence of wiring for lighting. Given my predicament with the lights, this ...